Showing posts with label creativity. Show all posts

Saturday, May 12, 2012

My Delightful 'New' Space!

Another item that got me off my organizational track--but was well worth it: the long-planned 'studio' reconfiguration finally happened! My dear, sweet 'better half' gifted me with made-to-order cabinets that we've pondered for quite some time. I was thrilled they were actually appearing! I had been scheming & planning how to rearrange for over a year.
Then last fall, I took a half-day class with Lois Hallock which was well worth it. Lois has great tips, tricks, & facts to help--& she suggests coming up with at least six different floor plan layouts before you settle on THE one. (that's not easy!)
By the time the cabinets were in progress, I was pretty clear how I wanted things to go. In the end--there were only two minor surprises that I'd not considered & they were easily resolved; I thought that was reasonable!
flat folds at eye level

I knew it would take some time to make the transition--but as usual I under estimated! Good for me: I planned the move for spring break to be sure I had time.
It took almost two full days just to organize fabric--I think I touched almost everything in my stash except the scrap bins.  My overflowing drawers & containers were rearranged into flat folds & fat quarter containers.
Lois is a proponent of flat folding anything over about a half yard. When I took the class, I wasn't convinced--but I am now! It looks nice, it's easily usable, & harder to lose track of things.
10 boxes of fat quarters
after the 'big sort'
I found some well made cardboard containers for my fat quarters that fit nicely into the open space I requested in the cabinets.
Now everything is near at hand, project boxes & other larger supplies are stowed in the cabinets out of sight, and the drawers in my cutting table (that used to be bursting with fabric) are filled with all my other art & embellishment supplies.
My design wall is now able to be expanded easily when needed--& I have my closet 'back'! (it used to be behind the design wall--it was usable but not handy). I made a special top for a counter height shelving unit I hadn't been using & now it's a perfect ironing center. The ironing board only has to come out for big projects!
I have room for my sweetie to join me for a movie if he wants, & I can even have a friend over for a sew play day. 8-)
Mr Creative put the doors on the cabinets just last week--so the camouflage is complete! Only things left: I'm snooping for some interesting door handles & I'm hoping to give the 'guest' chair a bright & funky face lift this summer. The cabinet doors won't likely stay pristine white--they seem to be calling for some small projects on display...or a mural, or...but that's a project for another day!
I didn't really have 'before' photos (didn't think of it in time) that tell the story--so you'll just have to believe me:  this is a huge improvement! I just love to go in there & sit--and it's been so much fun to work in (although I've not had as much time as usual lately!).
There is plenty of room to grow & still stay organized. Heaven!!

Sunday, January 22, 2012

The "Mushroom Trees" UFO

Here's a long-term UnFinishedObject that's finally filtered to the top--and then the 'finished' column. *whew*
It's had several stops & starts along the way, & I'm very sorry not to have true 'before' & 'after' pictures. Started out when I was fortunate enough to take a Joan Colvin class many moons ago (sad to say, she passed away in 2007; here's a link to her final book).  The class was great--learned a lot--and got a good start on two projects. One--an attempt at Ebey's Landing--ended up getting reduced down & was added as the center picture in Devin's graduation quilt (give you a clue as to how long my UFO's been in limbo?!).
Anyway--the other, bigger item languished--and then went into a box, out of sight when Dev pegged it the 'mushroom trees' picture. (unfortunately, he was right...& I couldn't stop seeing mushrooms when I looked at it!) Honestly forgot all about it when I put together my first list of UFO's so it wasn't even on the radar screen until a couple a years later.
I finally got after it on one of my day-outings to my friend's long arm studio. She's a great art-quilter herself & has done some amazing items with organza & a soldering iron.
Yup--that's right! The plumbing tool turned quilter's friend. The trick for this approach is being with the long arm & all the aforementioned items at the same time. Get the project loaded on the long-arm & then overlay the organza of choice (in this example it's a nice golden orange).
 Using cotton (only) thread, stitch all the way around the perimeter of the area you want covered--don't do the final quilting yet. Then, using a very hot soldering iron with a nice pointed tip--work your way around the edge that's just been stitched. (Like in the photo below--& the little bit of 'tree trunk' in the lower left above.)

This picture (above) shows what's left after the first cut. All of the varied golds, yellows & oranges blend together so much more subtly--it's a cool (& fast!) fix.One key thing when using the soldering iron: what ever is being cut away needs to be synthetic & the under pieces & thread need to be cotton.
The next layer--which unfortunately I don't have a photo of--was a nice, rich, purple toule (which is just a very fine net). The color mutes pieces beneath, but not as much as you would think--and adds a wonderful depth. (You can compare the difference between the uncovered areas above & the final view below.)
So the purple cover went over the whole piece--and was then cut away at the border with the background.
Now I can quilt! Lots of fun thread play to add texture & color variations...
The next challenge: how to finish it? There are many Joan Colvin ideas I've used since her class, but one approach that I will not do again: she has you start with the back, with batting on top, right on your working wall. All the top (design) pieces are pin basted so you end up with a very complicated, prickly sandwich ready to quilt. Not a bad concept--but my fatal error was a back & bat that didn't quite measure up. Had to do some Houdini work to make it look planned--which it was not.
click on the pix for a bigger view...
So here's the final product--it measures about 32" x 36". The hanging rod (which needs to be a little shorter) is some great black bamboo from a friend's yard. (They were just gonna toss it on the trash pile!!) In the end, I think this was a UFO worth salvaging...

Thursday, January 19, 2012

Folding Can be Fun!

I haven't said much about what my round-robin group is doing this year, but thought this month's project was worth a post.
To have a year of 'less stress' we've each picked a 'book of blocks' that travels with a box of fabrics for each person. We make a few blocks for the person & hand it on.
My pal Lynn chose "3 D Folded Blocks" by Baron & Vermeer and once you catch on to the instructions, it's a blast!
 The only stitching is around the outer edge of each block. The rest is cutting & folding with a nice hot iron! The blocks can get pretty bulky as there may be up to eight or nine layers (of folded fabric). It'll be fun to see what she does with the pile of blocks that will be heading back to her--she wanted a black & white theme with some brights to add some pizazz!
These were my additions--aren't they cool?
Click on the pix to look closer..

Saturday, December 31, 2011

Sisyphus Revisited...

The other end-of-year recap is in the UFO category--and shall we just say: not as good as the reading list? Or even: why bother?!
Actually, the list is helpful, if for no other reason than keeping track of what's in there? (as in: what's in that box? What is that item on this list? etc...)
When I take into account all of the items that were finished this year, it feels pretty good--but the majority of those were new items. I keep thinking up more to do...and then there was the show in December...and don't forget a variety of samples for the quilt shop.
Simply put: I haven't been avoiding the quilting loft--but I could be guilty of stepping away from the UFO list.
Looking at the list at the end of the year is also helpful in asking:

  • Do I want to keep this dang thang on the list for another year?! 
  • Is there a way to re-purpose the project into something I want to complete? 
  • Or maybe downsize the project into something nearer completion? (translation: cut your losses & move on...
  • Or maybe let go of the 'art' of the project & finish it up as a community quilt? 

It is a time of winnowing down for sure--and unfortunately, adding other items that now meet the definition of being 'unfinished'.
So here are the 2011 stats: started with 31 on the list & finished a whopping 5 (16%). Wow. *sigh*
For the 2012 list: 18 current items are moving forward, 2 are being "chopped" & 7 are being "moved". 15 new items are being added. Truly a 'Sisyphus list' of 33 items...
A note about 'moved' items: I always have a group of quilts that are fun & usually faster projects that work well for community quilts or something to grab for a quilting-day-out with my buds. Not really a focus for completion as much as ready to go as needed. So they're really not 'chopped'--just side-lined! 8-)
A note about 'new items: in the 'starting the year with a clean slate' department: 2012 will include a new challenge for myself. I haven't quite defined the 'rules' yet, but I definitely like the learning & creativity that come with a more structured focus. I missed that in 2011. More on that later. But in efforts to help myself out, the almost-monthly challenge of 11 items is going on the UFO list!
(...and no, that's not cheating! I thought up the dog-gone project before 2011 was over--so it's already a 'work-in-progress'! See how easy it is to get behind?!)
Wishing you finished 'lists' of your own in the new year!

Tuesday, December 27, 2011

Show & Tell...

Here's a guy that's been on the UFO list for way too long!
(...but it's finished--woohoo!)
It started out many years ago as several traditional blocks for some forgotten project. When they went on the design wall at some point, their fish-like qualities became obvious so I had pieced it together with a wonderful mix of water fabrics--and then promptly stashed it away for some other urgent project. 
When I drug it out to finish, it seemed pretty boring. I added the wrong-way-Feldman orange fish & an asymmetrical border (of course!) with some fused sea flowers--and then added some interest with the thread design on the long arm.  I also added the three dimensional sea grass on the long arm--another technique trial that I will definitely revisit in the future. 
In the end I was okay with the mix--and also okay with saving a discarded project. It finished out to a fairly large wall hanging (48" x 31") that unfortunately required Jim to fabricate a special hanging dowel for me! (thanks, Jim!)
Anyway--a woman kept coming back to it at the show & finally bundled it up & took it home with her as a very happy camper! Doesn't get much better than that...

Friday, December 23, 2011

Show & Tell...again!

Before the show this month, I spent a couple of days at my friend's long arm studio finishing up some items--this being one of them. I finished the top when I went to retreat in October & it looks pretty sharp after it got quilted (if I do say so myself!). It's done with the same piecing technique that I started using when I made Devin's graduation quilt years ago--and then made a 'left-over' lap quilt a couple of years ago.
The border was done with red thread to add a little more interest (...and also highlight any of my advanced beginner quilting technique errors!). When the border was quilted, I went around the set in red-bordered blocks which makes them really 'pop' as a faux-trapunto look.
 The finished piece is about 44" x 60"--an okay size for a cozy lap quilt, or a large wall hanging.

Thursday, December 22, 2011

More Show & Tell...

Here's some more items that were recently finished up. They're all about 9" x 11" little wall hangings--fused, toule over, & embellished with thread. They got little hangers added to them after the photos were taken. 


The second set started with a remnant of Marimekko fabric that I scored some time ago & used the design to start the idea moving. They remind me of Dr. Seuss for some reason... 
...sorry for my blurry view...

Tuesday, December 20, 2011

Show & Tell...

Here was one of the items that got finished up for the show/sale this month.
It started out with three different shapes that were each cut out three times & then arranged differently. (It was a long-ago exercise from the Art Quilt Workbook by Waterson & Davila that I was working through.)
Much later, I came across the three little pieces & thought I should do something with them--so I made the three panels & embellished them with paint & ink.
Then much after that, I finally got them together, but some purple toule over (more about that in a later post), & did some thread painting.
The piece came out about 29" x 20"--and went on to a happy home during the show...

Monday, December 19, 2011

It's Over...

The show came & went this weekend--whew! 
...my little 'section'...
No complaints, though, about attendance, sales or weather--good time had by all!--and now we're all pooped puppies!  8-)
...the 11 'partners in crime' at the end of a long 2 days...
(It's another month until Christmas, right?!)
I learned a lot & made new friends in the process--as well as reconnected with many 'old' friends!

The chatter about 'next year' has already begun...

Wednesday, December 14, 2011

Almost Showtime!

The three-day count down has begun--let the frenzy begin!
Jim & I had our brief moments of 'fame' on the event website--ha ha! Check it out when you have a minute. I'm trying to take pix of items as they get finished up, so I can share when I have a moment.
Meanwhile--may the force be with us; this is the time we wish we had a 'wife' to cook & clean while we're in our respective workshops!  8-)

Thursday, November 3, 2011

Now For Something (almost) Completely Different...

Jim & I are both participating in a December event:
Made Right on Whidbey (check it out!).
That's a first for us--both together. Jim's done many similar events: show/sales, studio tours, etc. I feel kinda like the little kid that gets asked to sit at the grown-up's table--but it's been a good experience for me (so far...). Makes me stretch...
After the December week-end has come & gone--I'll let you know how it went!

Tuesday, September 6, 2011

Color Me Red & Black

Belatedly, here's a UFO that was (too) long in the making. Happily, it finally reached it's home this summer--& I thought it would be a good example of how some projects come together.
Quite some time ago I began to gather unique pieces for a red & black project--no special intent; I just liked them. It started with acquiring a Merimekko print I really liked (and on sale! What could be better?!) I've had a forty year love for Merimekko designs & thought they were no longer being produced until I accidentally stumbled across a little shop near Pike Place Market (Seattle) that sells a small but great collection. Turns out they've been produced all along, but US consumers kind of 'lost interest' for them so we went a long time without seeing them much. They didn't ask me! 8-)
When visiting Mike & Lynn's new island condo, which had a mostly white palette with some black & red accents, I got inspired! The red & black would be something to add to their nice big walls as a house warming gift! (Little did I know that they would be long-settled before I was able to hand it over...)
Besides the Merimekko piece, I had acquired three other great red & black bargain pieces --so this is what I started with:
The next step was to audition a wide variety of other pieces that might be good complements or contrasts with these anchor pieces. For me, that part of the process can get pretty carried away: many fabric drawers open, pulling anything that might be a possible cast member. It usually gets pretty wild & messy--but I want to think big, think inclusive, for that part.
Once all of the possibilities I can identify are out 'on the table' (or on the design wall...) I start to look for good combinations--and conversely for sore thumbs that might be great, but not necessarily for this project. The narrowing down starts. The picture below is about half-way along the weeding out process. (I got so caught up in the fun, I forgot to take pix when everything was up!) By the end of this phase, there is a 'for-sure-will-use' pile, a 'might-be-great-to-add' pile, and a 'doubtful-but-don't-put-them-away-yet' pile. Still pretty messy...

Then the 'putting it together' process starts. I tend to draw only one or two quick sketches--I'm not a methodical planner or drafter at the outset. I have a general notion in my mind's eye, but I also like to let the piece shape itself as it progresses--not be really set on what I think it should be. That can be good & bad. The good part is: almost every time, I end up adding elements I would not have thought of beforehand. The bad part is: I can sometimes get hung up on technical aspects; how do I pull off this little idea? (That can turn out to be a good thing, though, as I have to stretch my skill level a little more each time...)
Things start to take shape--first with smaller elements & then tying them into the larger piece.

That very linear (horizontal,vertical) begins to bother me--too much. So the little regimented squares & rectangles become more casually placed & uneven in size.


What started as a worry about being too wide & short later becomes a worry about maybe too tall & square! (this is a big piece--over 50" both ways at the moment) Other worries keep cropping up:
The central piece should be showcased, but not simply framed top & bottom.
The central piece should be cut down, but not too much.
 It's awfully red!
It's awfully big!! 
On & on... but gotta keep moving. Don't get paralyzed!
Once the piece is together, it's off to the long arm studio. My quilter friend made a great suggestion: use a very lightweight poly bat (not something I prefer for most pieces). It's whisper light-weight but adds so much depth. The non-quilted sections stand out remarkably with a faux trapunto appearance.
Now for the embellishments (beads & some fabricated baubles), then stretched on a wooden frame for canvases, & viola--ready to hang! Finishes out at 48 x 52. Here's a photo in it's new surrounds! (as ever, you can click on the picture for a better view...) It arrived just in time to help tip the scales for a choice of color to paint the wall--& I think was well received. Finishing is bliss...!

Monday, July 18, 2011

Round Robin Update - the wayward block returns

You may (or may not!) remember my block that started the rotation for the most recent Round Robin exchange.  Fairly unassuming 8" little fella that left me long ago & had very few 'rules' attached to it.
The primary one: not to be wider than a certain measurement, as I wanted to be able to use it as a hanging in various areas of choice wall real estate. So compared to many that were included in this project mine remained much smaller--and looks the least 'finished' of any in the bunch (currently it's about 27" x 33").

The little traveler just returned home to me last weekend--so we're just getting reacquainted after about 15 months on the road. I'm thrilled! My ten team mates really pulled the stops & let their imagination go--I love that part! There are many embellishments, along with paper-piecing additions, three dimensional items, & Seminole piecing. It has so much potential--so many options--for completion. I can hardly wait! (but I'll have to for a little while at least...got get some other items finished & the quarter complete!)

You can click on the 'Round Robin' label at the bottom of the post to see the rest of the projects in this round--at least at the state they were in when I touched them!  Everyone seems quite content with their projects when they returned--although many were shaking their heads at mine, wondering "now what will you do?!". I think it's an honor that they broke out of the box on my behalf--regardless of how uncomfortable they may have been! Stay tuned for 'the rest of the story' later in the year...

Tuesday, July 12, 2011

Round Robin Update - the nearly last installment

Down to the final lap on the Round Robin projects--finish the last two, and then receive mine back with all of it's additions.

this is the 'before' shot--don't you love
the various embellishments?
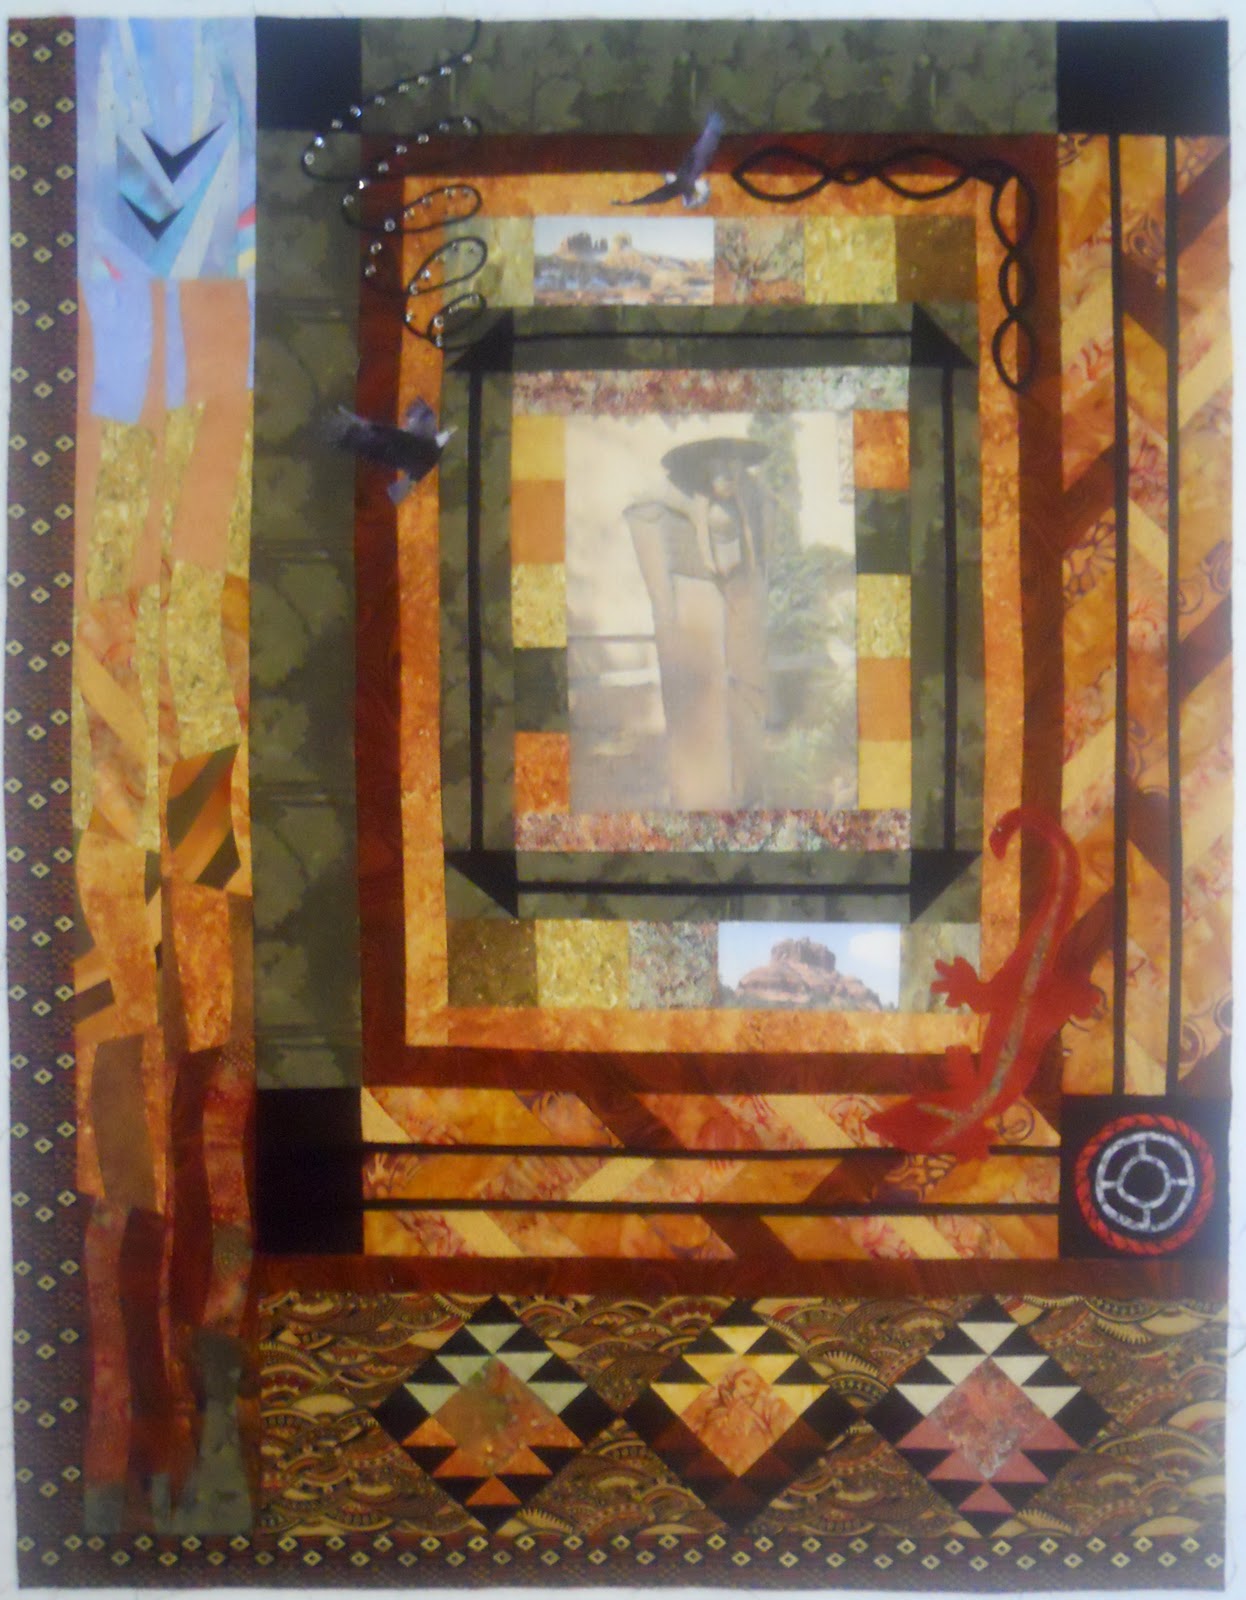
This project belongs to my buddy, and often roommate at retreats, Kate. She started with an ethereal photo transfer of a statue she saw in Sedona, when on a very heartfelt get-away with her sisters following the loss of their parents--truly a sentimental piece.
There is only one more person after me, so there have been eight hands on this little gem.  You could have called it complete on arrival, couldn't you? (The great red lizard had just been added before I got the project box!)
After much thinking, I added those elements I most loved when I lived in Arizona:  the many colors of the sky--with the ravens on the wing--and the melting of the sky into the amazing landscape of so many colors.  Of course, I had to go with something a little less linear, so in went the curvy piecing, along with the First American influence of shapes & textiles. (Or at least that was my intention!).
Right up until packing it in the box & sending it along I debated over the blues--pretty risking move, which Kate may not like.  Also a bit on the busy side, but the piece holds up well, I think.  It's a little over 2 ft. tall now, so will make a lovely wall hanging for Kate's studio.  Bye for now, Mr. Wiseman...

The final project for me in this Round Robin journey was Juliann's sea-life homage.  It started out with her center block fish--which I love.  It's full of color & texture & character.  When it first started making the rounds, I wasn't sure where it was going--or if I would like it--but it's really quite fun!  There are so many surprises (little & big) included!  Don't you love the translucent jellyfish?! I added the left & upper borders--with aquatic colors & the great orange added previously.  I came across a piece of undersea print that seemed a perfect addition to the mix. I think Juliann will have a lot of fun  finishing this one up--and the size will make a nice wall hanging (about 3' x 4'). It's got some great embellishments & she'll likely add more.
 So all of the projects will soon be home to their owners--mine included!

Wednesday, June 8, 2011

Wednesday on Whidbey

Can't believe this is the 'anniversary post' of Wednesday on Whidbey!
Wow!--a full year of little glimmers into the day-to-day life on my out-of-the-way island. There were a few times I wasn't sure I would make all fifty-two, but I did it!  I thought for this post, I would use one of the photos I auditioned for the very first Wednesday on Whidbey, but didn't use:  my sweet Cassie (now 13 this year...) basking in some surprise June sun (that would not be this year!).

So whadya think? Keep going?!
Knowing that I promised myself a weekly commitment has certainly allowed me to look more closely at my world & revel in the little vignettes that seem to be everywhere. (I think any kind of consistent practice is a hidden gift. For more on that, visit Make Something 365. Although that's a daily practice, there are similarities.) As far as I can tell, I've only been late once.
I certainly have identified more options for weeks to come--things pop up everywhere once you start noticing. The limitation is always being in the right place at the right time for sun, rain, time of day, traffic, etc.  And of course, my on-again, off-again camera skills are always a limitation...
Any feedback would be helpful & appreciated.
And thanks for joining me for this '52'--it's been fun!

Thursday, May 19, 2011

A Picture Paints a Thousand Words...

One of the things about being an 'artist-wanna-be' is the opportunity to be blown away by the creativity of others regularly. I think the 'wanna-be' part leaves you more vulnerable.  Does that happen to you?
Sometimes when that happens, you say to yourself; "wow, what a brilliant idea--how come I never thought of that?!" (It's so obvious, now that you've shown me!)
 Sometimes it's, "wow, I really like that concept, but I would do it differently"--and occasionally I do use the idea for a 'creative step' to something completely different.
Many times, though, it's "wow, what a brilliant idea--and applied so well; I could never come close to that!" In those cases, most often the concept is so creative, it is truly unique; it stands alone.

That was certainly the reaction to seeing Ohio artist, John Sokol and his word portraits ('sketching' the person in their own words). Wow! (and maybe because he chose some of my favorites to depict...)

I must also give credit to the Amusing Planet  site which took me to the word portraits in the first place--and so many other wonderful wanderings over the months.
Thank you to both!

Saturday, May 7, 2011

Bowling Again...

Stolen moments amidst the wild spring of clinical shifts to help a friend with a Relay for Life fundraiser...

these are the same bowls, reversed.

Tuesday, March 29, 2011

Red & White Revisited

Remember when I posted the info about the red & white quilt show by the American Folk Art Museum this month? Being on the 'other coast' it was out of my reach, but I was hoping many other 'someones' would get there.
 Well, here's a post from Natalya Aikens, who attended & then posted her photos over the weekend.  Many thanks, Natalya--always love to visit your blog!

Friday, March 4, 2011

Round Robin Update - the next installment

I'm nearly caught up on my monthly Round Robin projects--and good thing, too, as there are only two remaining after these two.

(Reminders: each has a 'before' & 'after' view, and any can be larger if you click on the photo.)

Kathy has a nice eye for traditional quilting & embroidery, so for her project she started with the nicely embroidered red work strawberries.


Remember the little pinwheels I was in the midst of?
Well here they are, completed and in the newest border, along with a great red & black batik that blended nicely with the previous addition. This piece is getting fairly large--it was over 50 inches when it went on it's way. One more person needs to do her magic before it comes back to Kathy. She thinks this will make a nice table-topper when it's finished--I agree! (I also hope those white/light corners have more embroidery added--but by a braver soul than I!)

When I got the pictures ready for this post, I realized the similarities in these two pieces with the flying geese around the square on point.  I had not really 'seen' that until now, as these two are so different from one another!

This is Lynn's--and started with her lovely appliquéd ginkgo in Asian prints. It, too, has only one other player yet to make an addition after mine, and is also getting fairly large--it's just under 50 inches. This piece has some really interesting embellishments including beading on the center flowers, painted ginkgo on the silk border near the middle, and some little rhinestone flip-flops added near the green triangles!


I really like all of the individual items--but something about the color combination puts me off a little. Is it just me?  I think it's because the purple silk 'reads' almost pink from a distance & then some of the painted ginkgo are very bright (shamrock) green. It has some lovely attributes, though, and Lynn will finish it beautifully when she gets it back.  Anyway, I added only a top & bottom border--don't ask me why! It needed a little more detail after those nice expansive stripped borders were added, so I tried to replicate the 'on point' look of the center piece. Asian fabrics are so fun to work with, and the purple/green combination is delightful.  It's now heading to it's last contributor before it returns to it's rightful owner.

Tuesday, February 22, 2011

It Seemed Like a Good Idea...

Too soon to post about the latest round robin projects--execpt to confess the challenge I got myself into for a border addition!

35 little pinwheels (i.e. 1 1/2" squares) didn't seem like a lot--but then two sides of a border made that into 70 pinwheels.
 O-kay...
the garbage pail of cut-offs...
And then each
2 1/2" square pinwheel needs four half-square triangles, and--wha-la-- suddenly you find yourself making 280 half-square triangles!

Kept me out of trouble for awhile...


In general, I'm not a fan of red & white quilts--which this project is--but I can be persuaded. And I certainly admire & respect great work, even if it's not my cup of tea.
When I was looking around for red & white themes I came across this upcoming March exhibit notice for the American Folk Art Museum in New York. I found this photo mesmerizing!
Hats off to the exhibit magicians! Let me know if you happen to get there to see red--650 times! I'll be green with envy...